Showing posts with label child. Show all posts

Thursday, March 31, 2011

KUNG FU PANDA SUSHI BALLS

KUNG FU PANDA SUSHI BALL - a kung fu celebrational recipe for kids!

Kung Fu Panda, my all time favorite kid's cartoon movie is coming out with a sequel in June, 2011. Kung Fu Panda 2, - I can't wait! I'm throwing a Kung Fu party in it's honor. I so wanted to call this party dish "Panda Balls", but for the sake of a "G" rating (sorry the movie can't boast the same), we'll call it Kung Fu Panda Sushi Balls.

When the blessing of children was bestowed upon us, my husband and I relinquished control of all TV programing to the likes of Dora & Barney. I'm now pleased to say that my little viewers have reached an age of maturity were we can find mutual entertainment in family classics like Kung Fu Panda. This show is packed full of culture, artful graphics, brilliant musical scores, side-splitting humor and unparalleled wisdom. I've lost count of the number of times I've been forced to re-tweet insightful quotes from this film. One of favorites was issued by Master Ooguay: "Yesterday is history, tomorrow is a mystery, but today is a gift. That is why it is called, the present." - savor it!

As a mom, nutrition is first and foremost, even when it comes to party fare. I'm always trying to introduce and incorporate new foods. I'm sure we are all aware of the health benefits of Nori, the eatable seaweed found in Sushi. If not, you can take a crash coarse with the Nutrition Diva. And when it comes to raising healthy kids, well as Po says, "It's gonna take a lot more than dew, and, uh, universe juice."

INGREDIENTS:
1 Cup Sushi Rice
8 oz. Chicken Tenders
2 Tbs. Unseasoned Rice Vinegar
2 Tbs. Granulated Sugar
1/2 Tbs. Sea Salt
Soy Sauce or Teriyaki for Dipping
Wasabi? - well, only if you're looking to invite the "Kaboom of Doom" into your mouth.

Our young chefs begin by adding 1 cup of Short Grain Sushi Rice into a small mixing bowl. They next add a generous amount of cool water. They swirl the rice in the water to rinse off the extra starch (this will prevent an unwanted "gummy" texture later). They drain the water off and repeat this process 3 to 4 times, or until the water becomes clear.

Our chefs strain the rice from the rinsing water and transfer it to a medium saucepan. They add 1 & 1/4 cup cool water to the rice. The supervising chef places the saucepan over high heat and brings it (uncovered) to a boil. Once it begins to boil the heat is reduced to the lowest setting and saucepan is covered. The rice is cooked for 20 minutes on low heat (do not lift the lid during cooking). It is then removed from the heat and allowed to stand (covered) for 10 minutes.

While the rice is cooking, our chefs add 2 tbs. unseasoned Rice Vinegar to a small saucepan. To this they add 2 tbs. Granulated Sugar and 1/2 tbs. Sea Salt. The supervising chef warm the saucepan over low heat until the sugar and salt is dissolved into the vinegar.

Meanwhile, the 8 oz. of Chicken Tenders are sliced in 1/2 thick strips by the supervising chef. They are seasoned with salt and pepper and cooked in a saute pan over medium heat until golden brown and cooked through (about 6 minutes per side).

Our young chefs are allowed to hone their (butter) knife skills as they cut the cooked chicken strips in to 1/2 inch cubes.

When the rice is done resting, it is transferred to a large glass baking dish. Our chefs pour the cooled vinegar mixture over the rice and "very gently" fold the rice to coat each grain. The rice is allowed to cool further to room temperature.

Our chefs spread a sheet of plastic wrap over a sushi mat. They mound 2 tbs. of the cooked sushi rice into the center. A piece of the cooked chicken is pressed slightly into the mound and covered with a bit more of the rice.


Our young chefs then gather the corners of the plastic wrap and twists to form a ball of rice with the chicken tucked neatly into the center.

Our chefs then unwrap the Sushi Ball and places it on a traditional sushi serving dish.

The sushi rice is extremely sticky at this stage. Our young chefs dip their fingers into a cup of cold water as needed to prevent the rice from sticking to their hands.

The supervising chef cuts a sheet of Nori into thin 1/4 inch strips.

Our young chef wraps each sushi ball with a nori strip.

These sushi balls are excellent dipped in a bit of soy sauce or teriyaki sauce.

We do hope your little ones enjoy this recipe and their introduction to Sushi! You will, of course, allow them an attempt at dipping and eating these delightful sushi balls with an authentic pair of chop sticks.

Enjoy! And as always, if you have a recipe or cooking project that was a winner with your child, please email it to me at: info@chefsemporium.net, and we hope to see you again soon at The Chef's Emporium.


Saturday, September 25, 2010

MINI MEAT PIES

INDIVIDUAL MEAT PIES - a recipe for kids

Reminiscing about my childhood, Chicken Pot Pie from Marie Calender's is about the only "American Style" Meat Pie that comes to my mind. It wasn't until I married a South African that I received a proper introduction into the world of Savory Meat Pies. Curry Lamb Pies, Cornish Pasties, Shepherd's Pie, and even Steak and Kidney Pies (yes - real Beef Kidney) have graced my plate, and I have made room in my gastronomic repertoire for every single one of them. Likewise, I have developed a particular fondness for the Chutneys and Gravies that always ride sidecar.

Perhaps my fascination with pies is merely the packaging? Aahhh, it goes far deeper than that. However, anything wrapped in a flaky, buttery, golden, crisp crust is destined to be divine. Regardless of whether the edges are precisely crimped or rustically rough, the savory contents of the package becomes even more delectable.

These individual "Mini" Meat Pies were such a hit with my little ones. For some reason they relish in the idea that they can have their very own - individual - eat the entire thing - all by themselves, pie - on their plate. And for my dear Husband, well, in honor of the man that first introduced me to savory beef pies, I spiced the meat filling similarly to Boerewors - the indigenous Farmer's Sausage of South Africa. Devoured they were!

INGREDIENTS:
1 lbs. Ground Beef
1 Egg
1 Garlic Clove (minced)
1 tbs. Worcestershire Sauce
1/2 tsp. Ground Pepper
1/2 tsp. Salt
1/2 tbs. Ground Coriander
1/4 tsp. Allspice
Dash of Nutmeg and Cloves
1 tbs. Dried Bread Crumbs

1 Box Puff Pastry - Thawed and brought to room temperature

DIRECTIONS:
Position a rack in the center of an oven and preheat to 350º F

The one appliance that gets my 3 year old boy cooking in the kitchen with me - every time, is the spice|coffee grinder. I used whole Coriander, Peppercorns, and Allspice Berries and let my little chef grind them fresh for this recipe. The aroma is fantastic when done this way.

My young chef begins this dish by measuring and combining all the dry ingredients into a mixing bowl. Small measuring spoons filled with the fragrant fresh ground spices keeps him very interested in the task at hand. I allow my chef to stir, and stir the dry ingredients to his hearts content (he could do this till well past dinner time and far into bed time, if I let him).

Our chef then adds 1 table spoons of Worcestershire Sauce to the bowl . He stirs again.

Our young chef next tests his grip strength with the garlic press as he adds one minced clove to the bowl. And again, he stirs.

I give my little chef a metal spoon and hold an egg in the palm of my hand, wherein he delivers a healthy rap to crack the egg shell. I empty the contents of the shell into a cup and allow him to pour the egg into the bowl. Our chef stirs yet again.

I then add 1 lb. Ground Beef to the bowl and mix with my hands. I roll 9 balls out of the mixture and place them in a small baking dish. About 25 minutes a 350º oven should bring the internal temperature of the meatballs to 160 degrees.

Using one of the Puff Pastry sheets, I cut 3 long strips, which are again cut into 9 equal squares. I lay the squares on an un-greased cookie sheet and pre-heat the oven to 400º.

Our little chef places a meatball in the center of each pastry square and pulls all four corners up around the ball to overlap on the top.

Using a fork, he scores the top seams to seal the dough. As one can imagine, manufacturing these little packages was quite thrilling for the young chef.

Bake at 400º about 15 minutes, or until puffed and golden brown.


I do hope this recipe gives you and your little chefs some cherished time together in the kitchen, and ultimately some satisfied and content tummies. As always, if you have a recipe or cooking project that was a winner with your child, please email it to me at: kidsrecipes@chefsemporium.net, and we hope to see you again soon at The Chef's Emporium.
Wednesday, March 31, 2010

Matzo Ball Soup Recipe for Kids

Keeping traditions. Remembering the past. Honoring our heritage. The holiday of Passover marks the exodus of the Jewish people from slavery in Egypt. So rushed to escape were the Jews, that their bread did not have time to rise. Instead, they ate Matzoh, or unleavened bread. Typically, Jews replace all bread and bread products with Matzoh for the eight days of the Passover holiday.

At the core of Jewish Passover cooking is Matzo Ball Soup - and it is so good.

RECIPE INGREDIENTS:
1 Box of Matzo Ball Mix
2 Eggs
2 Tablespoons Vegetable Oil (-OR- Schmaltz if you are lucky enough to have it)
2 1/2 quarts cold water + 2 Teaspoons salt
1 pot of wholesome Chicken Soup (From scratch - again if you are so lucky)

Our young chef begins by adding 2 eggs to a small bowl.

2 Tablespoons of Vegetable Oil are added to the egg.

Our chef then thoroughly mixes these two ingredients.

1 packet of Matzo Ball Mix is added to the mixture.

Our chef again combines the ingredients, covers the mixture and places it in the refrigerator for 15 minutes.

A stock pot is filled with 2 1/2 quarts water, to which 2 Teaspoons of Kosher Salt is added. The pot is put on the stove at high heat and brought to a boil.

With wet hands to prevent sticking, our chef then forms the batter into balls, approximately 1 inch in diameter.

The Matzo Balls are dropped into the boiling water (by an adult, please) tightly covered and allowed to simmer for 20 minutes on reduced heat.

I do highly recommend chicken soup from scratch. It is nothing more than chopped carrot, onion, celery, a kosher chicken, kosher salt and a bay leaf or two thrown in for good measure. Cook on a very low simmer for 3 hours - I like to boil my soup until the chicken is literally falling off the bone.

Chag Sameach. Matzo Ball Soup, a tradition of centuries a true goodness for the soul.

Sunday, September 27, 2009

Vegetable Shish Kabob

Introducing vegetables to children - a daunting task. As mom to a two and four year-old, a frequent conversation topic with other parents is child nutrition. Recipes are frequently shared where the typical toddler snubbed veggies are minced, puréed, disguised and hidden into less threatening dishes for kids.

I'm saying . . . I'm tired of hiding. I'm done with masterminding dishes which incorporate invisible, odorless and tasteless vegetables. I'm ready to be bold. I want to simply put a brussel spout on a plate and see it eaten - well, that might be pushing it a bit far.

INGREDIENTS:
Various Colored Bell Pepper
Summer Squash
Zucchini
Crimini Mushrooms
Olive Oil
Salt / Pepper
Skewers (* if using the wooden type, they will need to be soaked in water for an hour prior to use; this prevents burning)

VEGETABLE SHISH KABOBS.

Anytime my kids put on their chef coats and stand at the counter ready to cook, they come ready to taste. We used some very basic vegetables for this recipe, I chose various colorful veggies, yellow summer squash, green zucchini, red bell pepper, yellow bell pepper, and brown mushrooms.

The little chefs began by washing the vegetables in a bowl of water. Because of their age (2 & 4 years-old) this is a very exciting, hands-on part of the activity.

We engaged in some culinary conversation while cleaning and the cutting the veggies. Topics of interest to a toddler; does it grow on a tree, hang from a vine or just sprout from the dirt? Topics of interest to older children; the Fruit vs Vegetable debate. Scientifically speaking, fruits are classified by having seeds inside (so, we can correctly call the bell peppers and squash fruit). In culinary terms, however, one would not consider pumpkin or eggplant on the fruit list.

We (meaning I ) cut the vegetables into 1.5" sized pieces. My little chefs reserved the pleasure of adding the pieces to the collection in the bowl.

The young chef then carefully pierces the vegetable pieces with a skewer to assemble the Shish Kabobs.

There are some fabulous marinades for Vegetable Shish Kabobs, one of my favorites recipes can be found at: The RecipeZaar.

Our young chefs chose to keep the flavoring of their Shish Kabobs classically simple. Using a basting brush, they "painted" the vegetables with a light coat of Extra Virgin Olive Oil.

The chefs completed their Vegetable Shish Kabobs by seasoning lightly with salt and pepper.

Our Vegetable Shish Kabobs were grilled on the BBQ, courtesy of Papa. I did not serve anything else with them, as this time I did not want their attention to be diverted to a buttery bed of steamed rice, or mildly spicy sausage (however these will be added, I'm sure, at their next encounter). The bell peppers and mushrooms were actually big hit with my little chefs. As for the zucchini and summer squash, well, we will just try a different vegetable next time.

We hope this dish will leave you able to add at least one new vegetable to your child's list of eatable foods. Thanks for bringing your little chefs to cook with us, and we look forward to seeing you again soon.

Saturday, March 28, 2009

Kid's Recipe for Deviled EGGS - an Easter Treat

Deviled Eggs - Kid's Easter Recipe

We are just beginning to enjoy some of the first tastes of spring. I packed a picnic lunch for my children a few days ago and headed off to our local botanical gardens. Watching my little ones delight in the colors, sights and scents of mother nature in bloom was such a treat.

Deviled Eggs - fine picnic fare; a recipe simple enough for a toddler to follow; the pièce de résistance at the Easter Brunch Table.

If you are in search of a classic deviled egg recipe, or looking to try some new flavors, you must check out www.deviledeggs.com, they have some great inspirations. Though the ingredients are traditional, our recipe measurements this week are "as the child adds them". My chef has such fun being in full command of the dish; and they turned out deliciously devilish.

INGREDIENTS:
6 Hard Boiled Eggs
2 Heaping Table Spoon of Mayonnaise
1 Good Squeeze of Mustard
A quick shake of salt
A long shake of pepper
1 Cap full of Vinegar
1 Cucumber
Some carrot and shredded lettuce for garnish


Our young chef begins by peeling her half dozen boiled eggs.

The eggs are cut length wise and the yolks are removed and placed in a small mixing bowl.

Our chef adds two heaping table spoons of mayonnaise (~ 1/4 cup) to the yolks in the bowl.

A healthy squeeze of classic yellow mustard is then added (~2 tsp.)

Our chef then adds 1 tsp vinegar to the mixture.

Add salt and pepper to taste.

The ingredients should be well combined until creamy in texture.

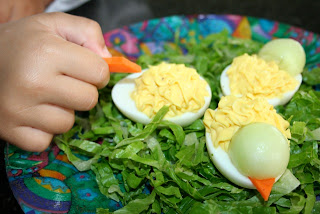
Using a pastry bag, our little chef then pipes the mixture back into the egg halves.

A melon baller is used to scoop half rounds are cut from a cucumber.

A small carrot wedge is placed on the narrow side of the egg, allowing it to extend slightly over the edge. This will become our deviled duck's beak. Recipe for Kids - Deviled Eggs Our chef then centers the rounded cucumber between the carrot and yolk mixture, giving our duck a stately and yet peaceful appearance. Shredded lettuce is used for a garnish.

We hope your kids have as much fun with this whimsical creation we did. If you have any great kid's recipes for spring, Easter or Pass Over, we'd love to hear you at info@chefsemporium.net. The Chef's Emporium wishes you and your children a very happy spring!

Monday, March 16, 2009

St. Patrick's Day - Pot ' O ' Gold at Rainbow's End

We see the Rainbows when we LOOK for them; And what else should we find at the end but a Pot ' O' Gold. As a child, my mother (along with my six siblings) used to make Butter Mints. As I recall, the recipe for this divine treat was a full glorious stick of old-world-style butter exalted with two heavenly, powdery pounds of confectionery sugar. We then were given permission to playfully add any combination of flavors (i.e.: cinnamon, almond, vanilla, mint, lemon) and colors. I was forced to consume at least two dozen mints just to get a proper sampling of the assortment. Alas, that was then.

Seeing as there has been a slight social swing and an awareness termed "health conscious", I have opted to give the cream cheese sugar mint recipe a try. It yielded a slightly stickier dough and didn't set quite as firmly as the original butter mint recipe. I had intended to roll out the dough and cut circles that resembled gold coins. Though we had to forgo this step, I think the end result was extremely tasty (I like the slight tartness of the cream cheese) and my little ones thoroughly enjoyed getting their hands involved in shaping the gold nuggets.
Here is our version of a St. Patrick's Day, Rainbow's End, Pot ' O ' Gold.

INGREDIENTS:
4 oz Cream Cheese
3 Cups Confectionery Sugar
1/4 tsp. Peppermint Extract
Yellow Food Coloring

Our young chef begins by adding her cream cheese to a large mixing bowl. We do recommend starting with an over-sized mixing bowl, as the dust, or powder I should say, will be flying shortly.

Our chef then adds 3 cups of confectionery sugar to the cream cheese. Using an old-fashion pastry blender, or potato masher, combine these two ingredients until a dough is formed. More powdered sugar may be added if your dough is feeling too sticky.

Our young chef then adds 1/4 tsp. peppermint extract.

She cautiously squeezes a few drops of yellow food coloring. The dough will then require refrigeration for 1 to 2 hours.

A sheet of wax paper is sprinkled with granulated sugar in preparation for our gold nuggets.

Our chef breaks marble sized portions from the dough and forms rounded nuggets.

After being placed on the wax paper, the nugget is sprinkled with granulated sugar.

Return the nuggets to the refrigerator, for at least 3 hours.

Happy St. Patrick's Day to you and your little chefs!

Saturday, December 6, 2008

Kid's Recipe for Christmas Candy - Chocolate Snowflakes

'Tis the season for snowflakes, gift giving, family and sweet treats. This Christmas Candy recipe is a whimsical delight that your child is sure to enjoy cooking with you, and sharing with all.

The list of ingredients for this children's activity is short and sweet.

INGREDIENTS:
Snyder's Pretzel Snaps
White Chocolate Chips
White Nonpareils

Our young chef starts by filling a zip-lock bag with 1/2 cup white chocolate chips.

PARENTS: Microwave the chocolate for your child until the chips become melted, about 1 to 1-1/2 minutes. Kneed the bag and set aside. Using scissors, snip off a very small amount from the corner of the zip-lock bag. Wait until the chocolate becomes cool to the touch before returning it to your child's hands.

Our chef arranges the Pretzel Snaps on a sheet of wax paper, placing them about 3 inches apart.

Our young chef now begins gently squeezing the melted chocolate back and forth across each pretzel. The chocolate is drizzled beyond the edges of the pretzel creating the wonderfully delicate snowflake design.

White Nonpareils the final playful touch to these winter holiday treats. Our little chef collects a pinch of the tiny white balls in her fingers and sprinkles them into the soft melted chocolate.
Even if it is not yet snowy outdoors, these chocolate snowflakes will ensure you and your little ones enjoy a White Christmas. The Chef's Emporium wishes you and your family happy holidays.

Sunday, November 30, 2008

Kid's Recipe for Autumn Leaves, A Thanksgiving Treat

MARZIPAN SNAILS - a recipe for kids

Our young Chef is cooking, or rather crafting, a special Thanksgiving treat for all the children at our holiday table. The Chef is working with Marzipan, a confection consisting primarily of ground almonds and sugar. Though Marzipan is not as popular in the US as in other regions of the globe, it is readily available at most grocery stores in the baking isle. I am always pleasantly surprised at the reception this unfamiliar treat receives, especially when presented in such fun and festive colors and shapes.
Our Chef has chosen colorful autumn leaves as a motif for her Thanksgiving treat.  There is not a recipe to follow for this project, but for any child that enjoys a hands-on food activity, this is a sure winner.  You will need the following.  

Ingredients:
Marzipan
Food Coloring

Our Little Chef begins by cutting the Marzipan loaf into sections. She presses her thumb into each of the sections to create a well, which will receive the food coloring. Our Chef chooses appropriate fall colors and squeezes three drops of food coloring into each well.

Our young Chef folds and mixes the food coloring into each Marzipan section using her fingers, she then rolls it into a ball.

Plastic wrap is used to cover the surface of a board, she places the colored Marzipan in the center, covers it with another sheet of plastic wrap and flattens the ball with the palm of her hand. The Chef then uses a roller to further stretch and flatten her Marzipan to about a 1/8th inch thickness.

Simple leaf shapes are cut out of the Marzipan and a vein is pressed into each leaf using the back of a knife. A wet paper towel is used to wipe the blade between each cut, keeping the knife moving smoothly.

Our Little Chef removes the excess Marzipan scraps and arranges her leaves on a sheet on wax paper, atop a small platter.

When all the colors of Marzipan have been rolled and cut, the Chef combines the excess scraps and folds them together to create a playful rendition of the natural fall colors. This Marzipan is again rolled and cut into leaf shapes.

After the Autumn Marzipan Leaves are artfully placed, simple Marzipan Snails are added as a whimsical completion of the display.

Our Little Chef wishes your young chef a very happy Thanksgiving and is sure this project will delight the kids seated around your holiday table. Thanks for cooking with us, and we look forward to seeing you again soon.