Halloween happens to be my favorite holiday! There is something so very precious about little faces painted as ghouls, or glittering in princess hues. Perhaps the appeal is simply celebrating the relief from a torrid summer season and embracing the brisk fresh air, the changing color scape of nature, and the anticipation and return school year socializing. Some say it's just all about the CANDY - and really, who can argue with that . . . Trick-or-Treat!
My kids are still a tad too young (3 and 4 years old) for the ultra ghoulish and gory Halloween decorating. Jack-o-Lanterns and ghosts are about as scary as we get at the moment. My children have, however, turned my home into a proper pumpkin patch. We have not carved any Jack-o-Lanterns as of yet (carve them too early and they go rotten by Halloween) but we have cut eyes, noses and mouths from yellow construction paper and taped them to the pumpkins.
I came up with these tasty Rice Krispie Treat Pumpkins because it gave my little chefs yet another chance to put faces the beloved orange squash.
RECIPE INGREDIENTS:
3 Tablespoons Butter or Margarine
1 Package (10 oz., about 40) Regular Marshmallows -OR- 4 Cups Miniature Marshmallows
6 Cups Rice Krispies
Orange Food Coloring
Assortment of Jellybeans, Bridge Mix, Licorice and Gumdrops for Decorating
Our young chefs begins by adding 3 tablespoons of butter to a large pan. I melt the butter over very low heat to avoid a scalding pot for little hands.
When the butter has been melted, our chefs adds 4 cups of miniature marshmallows.
I return the pan to the stove and heat again on a low temperature until the marshmallows are completely melted.
Seeing as orange is not a standard color in the food coloring pack, I added 2 drops of red coloring and 6 drops of yellow coloring.
6 cups of Rice Krispies were added to our colored marshmallow melt.
The mixture was allowed to cool for a few minutes before little buttered fingers began shaping 1/2 cup portions into balls.
An assortment of Jellybeans, Bridge Mix, Licorice and Gumdrops were used to design faces on our tasty Jack-O-Lanterns.
Thanks so much for joining us and we do hope you enjoy this festive twist on such a classic children's treat. The Chef's Emporium wishes you and your little ones a very frighteningly sweet Halloween. If you have any great kid's recipes for fall or Halloween, we'd love to hear you at info@chefsemporium.net.
Sunday, October 25, 2009
Sunday, September 27, 2009
Vegetable Shish Kabob
Introducing vegetables to children - a daunting task. As mom to a two and four year-old, a frequent conversation topic with other parents is child nutrition. Recipes are frequently shared where the typical toddler snubbed veggies are minced, puréed, disguised and hidden into less threatening dishes for kids.
I'm saying . . . I'm tired of hiding. I'm done with masterminding dishes which incorporate invisible, odorless and tasteless vegetables. I'm ready to be bold. I want to simply put a brussel spout on a plate and see it eaten - well, that might be pushing it a bit far.
INGREDIENTS:
Various Colored Bell Pepper
Summer Squash
Zucchini
Crimini Mushrooms
Olive Oil
Salt / Pepper
Skewers (* if using the wooden type, they will need to be soaked in water for an hour prior to use; this prevents burning)
VEGETABLE SHISH KABOBS.
Anytime my kids put on their chef coats and stand at the counter ready to cook, they come ready to taste. We used some very basic vegetables for this recipe, I chose various colorful veggies, yellow summer squash, green zucchini, red bell pepper, yellow bell pepper, and brown mushrooms.
The little chefs began by washing the vegetables in a bowl of water. Because of their age (2 & 4 years-old) this is a very exciting, hands-on part of the activity.
We engaged in some culinary conversation while cleaning and the cutting the veggies. Topics of interest to a toddler; does it grow on a tree, hang from a vine or just sprout from the dirt? Topics of interest to older children; the Fruit vs Vegetable debate. Scientifically speaking, fruits are classified by having seeds inside (so, we can correctly call the bell peppers and squash fruit). In culinary terms, however, one would not consider pumpkin or eggplant on the fruit list.
We (meaning I ) cut the vegetables into 1.5" sized pieces. My little chefs reserved the pleasure of adding the pieces to the collection in the bowl.
The young chef then carefully pierces the vegetable pieces with a skewer to assemble the Shish Kabobs.
There are some fabulous marinades for Vegetable Shish Kabobs, one of my favorites recipes can be found at: The RecipeZaar.
Our young chefs chose to keep the flavoring of their Shish Kabobs classically simple. Using a basting brush, they "painted" the vegetables with a light coat of Extra Virgin Olive Oil.
The chefs completed their Vegetable Shish Kabobs by seasoning lightly with salt and pepper.
Our Vegetable Shish Kabobs were grilled on the BBQ, courtesy of Papa. I did not serve anything else with them, as this time I did not want their attention to be diverted to a buttery bed of steamed rice, or mildly spicy sausage (however these will be added, I'm sure, at their next encounter). The bell peppers and mushrooms were actually big hit with my little chefs. As for the zucchini and summer squash, well, we will just try a different vegetable next time.
We hope this dish will leave you able to add at least one new vegetable to your child's list of eatable foods. Thanks for bringing your little chefs to cook with us, and we look forward to seeing you again soon.
Saturday, March 28, 2009
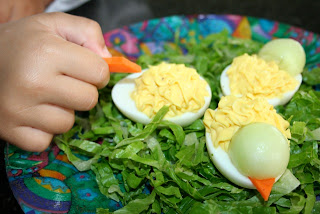
Kid's Recipe for Deviled EGGS - an Easter Treat
We are just beginning to enjoy some of the first tastes of spring. I packed a picnic lunch for my children a few days ago and headed off to our local botanical gardens. Watching my little ones delight in the colors, sights and scents of mother nature in bloom was such a treat.
Deviled Eggs - fine picnic fare; a recipe simple enough for a toddler to follow; the pièce de résistance at the Easter Brunch Table.
If you are in search of a classic deviled egg recipe, or looking to try some new flavors, you must check out www.deviledeggs.com, they have some great inspirations. Though the ingredients are traditional, our recipe measurements this week are "as the child adds them". My chef has such fun being in full command of the dish; and they turned out deliciously devilish.
INGREDIENTS:
6 Hard Boiled Eggs
2 Heaping Table Spoon of Mayonnaise
1 Good Squeeze of Mustard
A quick shake of salt
A long shake of pepper
1 Cap full of Vinegar
1 Cucumber
Some carrot and shredded lettuce for garnish
Our young chef begins by peeling her half dozen boiled eggs.
A healthy squeeze of classic yellow mustard is then added (~2 tsp.)
Our chef then adds 1 tsp vinegar to the mixture.
Add salt and pepper to taste.
The ingredients should be well combined until creamy in texture.
Using a pastry bag, our little chef then pipes the mixture back into the egg halves.
A melon baller is used to scoop half rounds are cut from a cucumber.
A small carrot wedge is placed on the narrow side of the egg, allowing it to extend slightly over the edge. This will become our deviled duck's beak. Our chef then centers the rounded cucumber between the carrot and yolk mixture, giving our duck a stately and yet peaceful appearance. Shredded lettuce is used for a garnish.
We hope your kids have as much fun with this whimsical creation we did. If you have any great kid's recipes for spring, Easter or Pass Over, we'd love to hear you at info@chefsemporium.net. The Chef's Emporium wishes you and your children a very happy spring!
Monday, March 16, 2009
St. Patrick's Day - Pot ' O ' Gold at Rainbow's End
We see the Rainbows when we LOOK for them; And what else should we find at the end but a Pot ' O' Gold. As a child, my mother (along with my six siblings) used to make Butter Mints. As I recall, the recipe for this divine treat was a full glorious stick of old-world-style butter exalted with two heavenly, powdery pounds of confectionery sugar. We then were given permission to playfully add any combination of flavors (i.e.: cinnamon, almond, vanilla, mint, lemon) and colors. I was forced to consume at least two dozen mints just to get a proper sampling of the assortment. Alas, that was then.
Seeing as there has been a slight social swing and an awareness termed "health conscious", I have opted to give the cream cheese sugar mint recipe a try. It yielded a slightly stickier dough and didn't set quite as firmly as the original butter mint recipe. I had intended to roll out the dough and cut circles that resembled gold coins. Though we had to forgo this step, I think the end result was extremely tasty (I like the slight tartness of the cream cheese) and my little ones thoroughly enjoyed getting their hands involved in shaping the gold nuggets.
Here is our version of a St. Patrick's Day, Rainbow's End, Pot ' O ' Gold.
Our chef then adds 3 cups of confectionery sugar to the cream cheese. Using an old-fashion pastry blender, or potato masher, combine these two ingredients until a dough is formed. More powdered sugar may be added if your dough is feeling too sticky.
Our young chef then adds 1/4 tsp. peppermint extract.
INGREDIENTS:
4 oz Cream Cheese
3 Cups Confectionery Sugar
1/4 tsp. Peppermint Extract
Yellow Food Coloring
Our young chef begins by adding her cream cheese to a large mixing bowl. We do recommend starting with an over-sized mixing bowl, as the dust, or powder I should say, will be flying shortly.
Our chef then adds 3 cups of confectionery sugar to the cream cheese. Using an old-fashion pastry blender, or potato masher, combine these two ingredients until a dough is formed. More powdered sugar may be added if your dough is feeling too sticky.
Our young chef then adds 1/4 tsp. peppermint extract.
She cautiously squeezes a few drops of yellow food coloring. The dough will then require refrigeration for 1 to 2 hours.
A sheet of wax paper is sprinkled with granulated sugar in preparation for our gold nuggets.
After being placed on the wax paper, the nugget is sprinkled with granulated sugar.
Our chef breaks marble sized portions from the dough and forms rounded nuggets.
After being placed on the wax paper, the nugget is sprinkled with granulated sugar.
Return the nuggets to the refrigerator, for at least 3 hours.
Happy St. Patrick's Day to you and your little chefs!
Subscribe to:
Posts (Atom)